
The British Mountaineering Council (BMC) is the voice of climbers across the UK, from novices to professionals. With over 80,000 members, they’re dedicated to helping more people get out and enjoy climbing, and to make this possible their members receive discounts on kit, travel, insurance and more. We've teamed up with the BMC to bring you a complete guide to climbing, whether you're just getting started or ready to take on rock for the first time.
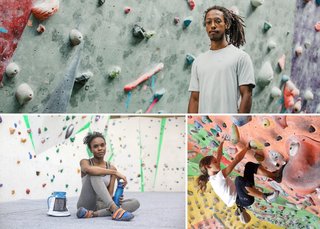
Start Indoors On A Wall
A great way to start climbing is at an indoor climbing wall. There are walls conveniently located in many parts of the country for easy access, and to get you started most walls have kit available to rent for beginners, and can offer coaching and supervision to help you learn the basic skills you need. Walls are also great places to meet like-minded people who are also just getting started!
To find your nearest wall, take a look at the BMC’s climbing wall directory.
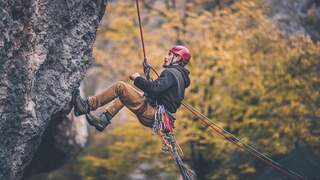
Moving From Wall To Rock
Once you're confident on the wall, it's maybe time to venture out onto rock. Climbing outdoors lets you experience new places, push your abilities further and learn new techniques - all with the additional benefits and rewards of being in the great outdoors.
There are a few ways that you can make the transition from indoors to outdoors both easier and safer:
1. Take a climbing course
A great way to make the transition is to sign up for an indoor to outdoor course. You’ll learn the basic skills needed to use ropes safely, as well as being introduced to issues unique to the outdoor environment like access and conservation. The BMC offers Ready to Rock courses regularly across the UK. If there isn’t a BMC course near you, ask at your local wall if they offer any similar courses.
2. Join a climbing club
Joining a local club is a great way to meet new people, discover new places and benefit from the other group members' experiences. Look out for clubs advertising at your local wall, or join your local BMC club if you're a member.
3. Go with experienced climbers
One of the best things you can do when you first start climb outdoors is to go with people more experienced than you. You'll not only get to see amazing new places, but you’ll also learn a huge amount about staying safe.
4. Hit the books
It’s a good idea to take a look at some of the information and support that’s available to you before you hit the rock. There’s a huge amount of online videos on BMC TV, demonstrating the equipment and skills needed to climb outdoors. For boulderers check out our introductory info here on having a great first time bouldering outside. We'd also recommend getting a guidebook for the area. You’ll be able to find detailed routes, plus information about the type of rock you’ll encounter and when to find the best conditions to visit.
What's The Difference Between Indoor And Outdoor Climbing?
Learning how to climb outdoors can be a challenge, but to help you to make the transition we’ve highlighted a few tips below:
- The most striking difference between the indoor and outdoor environment is the lack of safety equipment already in place. This means that at least one person in your group needs to be comfortable leading so that they can put up the rope for others to second or top rope.
- In addition, you need to understand the routes you intend to climb. Unlike indoors, outdoor climbs are not clearly marked, and spotting the ‘line’ can take some practise. It therefore helps to go with a guide or somebody who already knows the area.
- You also need to think about things like the length of the route, how much rope you’ll need, how many quickdraws you’ll need, and whether you can safely use a prusik and abseil. These things are simple to resolve when on the ground, but can pose significant problems if encountered when you’ve already set out.
- It’s also important to understand what type of climbing you will be attempting. This is vital as different forms require different types of equipment.
Types of Climbing
Bouldering
Bouldering involves tackling short climbs of a height where ropes are not necessary. Indoor bouldering is the most accessible and popular form of the sport, all you need are some climbing shoes and a chalk bag and off you go. Bouldering outside requires an additional skillset and you’ll benefit from having one or more bouldering mats or crashpads to help cushion your fall, as well as all the things you’d usually need for a day outside at that time of year.
Sport Climbing
Sport climbing is the type that's done in gyms or at equiped sport climbing venues, and the one that people are usually familiar with. Protection points and a fixed belay at the finishing point are in place, and the leader climbs up clipping in as they progress, all the time being safely belayed by an attentive partner. Indoor climbing often has the rope already in place meaning all that is needed are a harness and belay device. For lead climbing you’ll need a dynamic climbing rope as well, and when moving outside a helmet is always a good idea and you’ll need a set of quickdraws along with at least one screwgate karabiner.
Trad Climbing
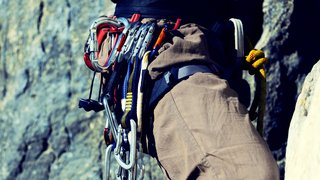
Traditional (Trad) climbing involves the first climber placing protection into the rock which are then removed by the following climber, resulting in no damage. This type classically requires the most equipment and, because you’re placing your own protection, generally requires a good technical understanding. The equipment you need to carry as part of your “lead rack” will vary depending on the length and type of the climbing route you’ll be doing but will usually include quickdraws, slings, nuts and some camming devices.

Climbing Equipment
Once you know what sort of climbing you'll be doing, you need to consider what type of equipment you'll need. These include but are not limited to:
- Bouldering pad: Layers of hard foam with a softer core help protect falls when bouldering, along with straps for carrying it comfortably.
- Climbing shoes: Snug-fitting with sticky-rubber soles, designed to give your feet better traction on rock.
- Chalk bag: A small bag attached to the waist containing chalk that is used to dry sweaty hands, increasing grip on the rock.
- Harness: A harness is worn around the waist and upper legs, and is used to safely attach a climber to the rope.
- Belay device: Attaches to the central loop at the front of the harness via a karabiner, and works by applying friction to stop the fall of a climber.
- Helmet: Falling objects and rocks are less of a problem indoors, but outside they are worth safeguarding against by using a helmet.
- Rope: The length you will require depends on the length of your routes, but something like a 60 meter rope with a 10mm diameter is enough to do a good selection of climbs.
- Quickdraws: This is two karabiners joined by a piece of webbing. Indoors these are already fixed to the wall, but outside you take, attach and remove your own gear.
- Sling and Screw Gates: Useful utility equipment for both sport and trad climbing, a sling can be used for a host of purposes, whilst a screwgate karabiner provides extra security when it’s needed.
- A Trad Rack: If you intend to go trad climbing then you will need to place your own protection. These are either wedges of metal called nuts that are jammed into cracks in the rock, or camming devices that expand and grip in place. You’ll also need quickdraws and some slings, and your second or follower should have a “nut key” to help extract and remove equipment placed during the lead climb.
What's A 'Pitch'?
Once you start climbing outdoors, you’re likely to hear a lot of technical jargon. One of the terms you’ll probably come across is a ‘pitch’. In this context, a pitch is a section of a climb that’s between two belay points. There are two types: single pitch and multi-pitch.
Single Pitch – A single pitch climb is the simplest to do. The climbers climb from the bottom to the top of a cliff, then down again. This is all done using one rope length. It’s a good idea to start off with single pitch climbs. Firstly, they’re the simplest to do, plus it’s easier to communicate with the other members of your group. You will also be able to complete more than one single-pitch climb in a day, giving you a good range of experience.
Multi-Pitch – A multi-pitch climb will require you to navigate multiple pitches in one climb. This type requires more work from both participants – you’ll probably need to be both the belayer and the climber at times. Multi-pitch climbing also requires more complicated communication, as the climber may need to instruct the belayer while out of sight.
Climbing Grades Explained
Both indoor and outdoor climbs are rated on difficulty using grades, and different styles are graded in different ways. There are French grades, adjectival grades, technical grades and combined grades.
Bouldering grades – there are two systems in common usage, Font grades and V grades with comparisons to each other here.
French grades – Indoor climbs and sport climbs will usually use a French grade. They start at 1 and increase relative to difficulty. Once you get to 4, subgrades are introduced, with 4a & 4b. There’s also 4a+, which sits between 4a and 4b.
French grades are as follows: 4 , 4+ , 5 , 5+ , 6a , 6a+ , 6b , 6b+ , 6c , 6c+ , 7a , 7a+ , etc.
British grades – Outdoor trad routes will usually be given a British grade which has two parts. First is the ‘adjectival grade’ to tell you how hard it is overall. The grades are: Moderate (M), Difficult (D), Hard Difficult (HD), Very Difficult (VD), Hard Very Difficult (HVD), Severe (S), Hard Severe (HS), Very Severe (VS), Hard Very Severe (HVS) and Extremely Severe (E), which is split into E1, E2 & upwards. Adjectival grades are based on a range of factors, including technical difficulty, relative danger and strenuousness.
Following this is the technical gradebased solely on the single hardest move on the route. Technical grades run like this: 4a, 4b, 4c, 5a, 5b, 5c and so on. A high adjectival grade and low technical grade implies a route which may be a risky undertaking, or be very sustained and strenuous, whereas a low adjectival grade and higher technical grade is often considered a safe but difficult test piece. Eg. E2 5c is fairly standard, E2 5a is probably loose, unprotected and terrifying, while an E2 6a likely to have a hard but safe move on it.
Produced in partnership with The British Mountaineering Council

Related articles


Let us know you agree to cookies
We use marketing, analytical and functional cookies as well as similar technologies to give you the best experience. Third parties, including social media platforms, often place tracking cookies on our site to show you personalised adverts outside of our website.
We store your cookie preferences for two years and you can edit your preferences via ‘manage cookies’ or through the cookie policy at the bottom of every page. For more information, please see our cookie policy.